夜间模式
安装Docker
注意时间
本文写于2024-07-16 5:27,时间间隔过长可能导致失效
一台刚配置好的linux,需要 安装依赖包
sh
yum install -y yum-utils device-mapper-persistent-data lvm2但是出现错误
错误
bash
Loaded plugins: fastestmirror, langpacks
Loading mirror speeds from cached hostfile
Could not retrieve mirrorlist http://mirrorlist.centos.org/?release=7&arch=x86_64&repo=os&infra=stock error was
14: curl#6 - "Could not resolve host: mirrorlist.centos.org; Unknown error"
Could not retrieve mirrorlist http://mirrorlist.centos.org/?release=7&arch=x86_64&repo=extras&infra=stock error was
14: curl#6 - "Could not resolve host: mirrorlist.centos.org; Unknown error"


 One of the configured repositories failed (Unknown),
 and yum doesn't have enough cached data to continue. At this point the only
 safe thing yum can do is fail. There are a few ways to work "fix" this:

     1. Contact the upstream for the repository and get them to fix the problem.

     2. Reconfigure the baseurl/etc. for the repository, to point to a working
        upstream. This is most often useful if you are using a newer
        distribution release than is supported by the repository (and the
        packages for the previous distribution release still work).

     3. Run the command with the repository temporarily disabled
            yum --disablerepo=<repoid> ...

     4. Disable the repository permanently, so yum won't use it by default. Yum
        will then just ignore the repository until you permanently enable it
        again or use --enablerepo for temporary usage:

            yum-config-manager --disable <repoid>
        or
            subscription-manager repos --disable=<repoid>

     5. Configure the failing repository to be skipped, if it is unavailable.
        Note that yum will try to contact the repo. when it runs most commands,
        so will have to try and fail each time (and thus. yum will be be much
        slower). If it is a very temporary problem though, this is often a nice
        compromise:

            yum-config-manager --save --setopt=<repoid>.skip_if_unavailable=true

Cannot find a valid baseurl for repo: extras/7/x86_64解决方案
进入CentOS-Base.repo
bash
nano /etc/yum.repos.d/CentOS-Base.repo修改为阿里镜像源
ini
[base]
name=CentOS-$releasever - Base - mirrors.aliyun.com
baseurl=http://mirrors.aliyun.com/centos/$releasever/os/$basearch/
gpgcheck=1
gpgkey=http://mirrors.aliyun.com/centos/RPM-GPG-KEY-CentOS-7

[updates]
name=CentOS-$releasever - Updates - mirrors.aliyun.com
baseurl=http://mirrors.aliyun.com/centos/$releasever/updates/$basearch/
gpgcheck=1
gpgkey=http://mirrors.aliyun.com/centos/RPM-GPG-KEY-CentOS-7

[extras]
name=CentOS-$releasever - Extras - mirrors.aliyun.com
baseurl=http://mirrors.aliyun.com/centos/$releasever/extras/$basearch/
gpgcheck=1
gpgkey=http://mirrors.aliyun.com/centos/RPM-GPG-KEY-CentOS-7

[centosplus]
name=CentOS-$releasever - Plus - mirrors.aliyun.com
baseurl=http://mirrors.aliyun.com/centos/$releasever/centosplus/$basearch/
gpgcheck=1
enabled=0
gpgkey=http://mirrors.aliyun.com/centos/RPM-GPG-KEY-CentOS-7设置阿里云docker-ce镜像源
bash
yum-config-manager --add-repo https://mirrors.aliyun.com/docker-ce/linux/centos/docker-ce.repo开始安装
bash
yum install -y docker-ceDocker从17.03版本之后分为两个版本:社区版(Community Edition,缩写为 CE)和企业版(Enterprise Edition,缩写为 EE)。 企业版包含了一些收费服务,个人开发者一般用不到,我们只需要安装社区版docker-ce版本即可。
bash
#  启动docker
[root@localhost ~]# systemctl start docker
# 设置开机自启
[root@localhost ~]# systemctl enable docker
Created symlink from /etc/systemd/system/multi-user.target.wants/docker.service to /usr/lib/systemd/system/docker.service.
# 查看docker版本
[root@localhost ~]# docker version
Client: Docker Engine - Community
 Version:           26.1.4
 API version:       1.45
 Go version:        go1.21.11
 Git commit:        5650f9b
 Built:             Wed Jun  5 11:32:04 2024
 OS/Arch:           linux/amd64
 Context:           default

Server: Docker Engine - Community
 Engine:
  Version:          26.1.4
  API version:      1.45 (minimum version 1.24)
  Go version:       go1.21.11
  Git commit:       de5c9cf
  Built:            Wed Jun  5 11:31:02 2024
  OS/Arch:          linux/amd64
  Experimental:     false
 containerd:
  Version:          1.6.33
  GitCommit:        d2d58213f83a351ca8f528a95fbd145f5654e957
 runc:
  Version:          1.1.12
  GitCommit:        v1.1.12-0-g51d5e94
 docker-init:
  Version:          0.19.0
GitCommit: de40ad0至此,docker安装完成。
Docker关于启动指令
Bash
# 启动Docker
systemctl start docker

# 停止Docker
systemctl stop docker

# 重启
systemctl restart docker

# 设置开机自启
systemctl enable docker

# 执行docker ps命令,如果不报错,说明安装启动成功
docker ps配置镜像加速服务
配置阿里云镜像加速
进入阿里云主页打开控制台
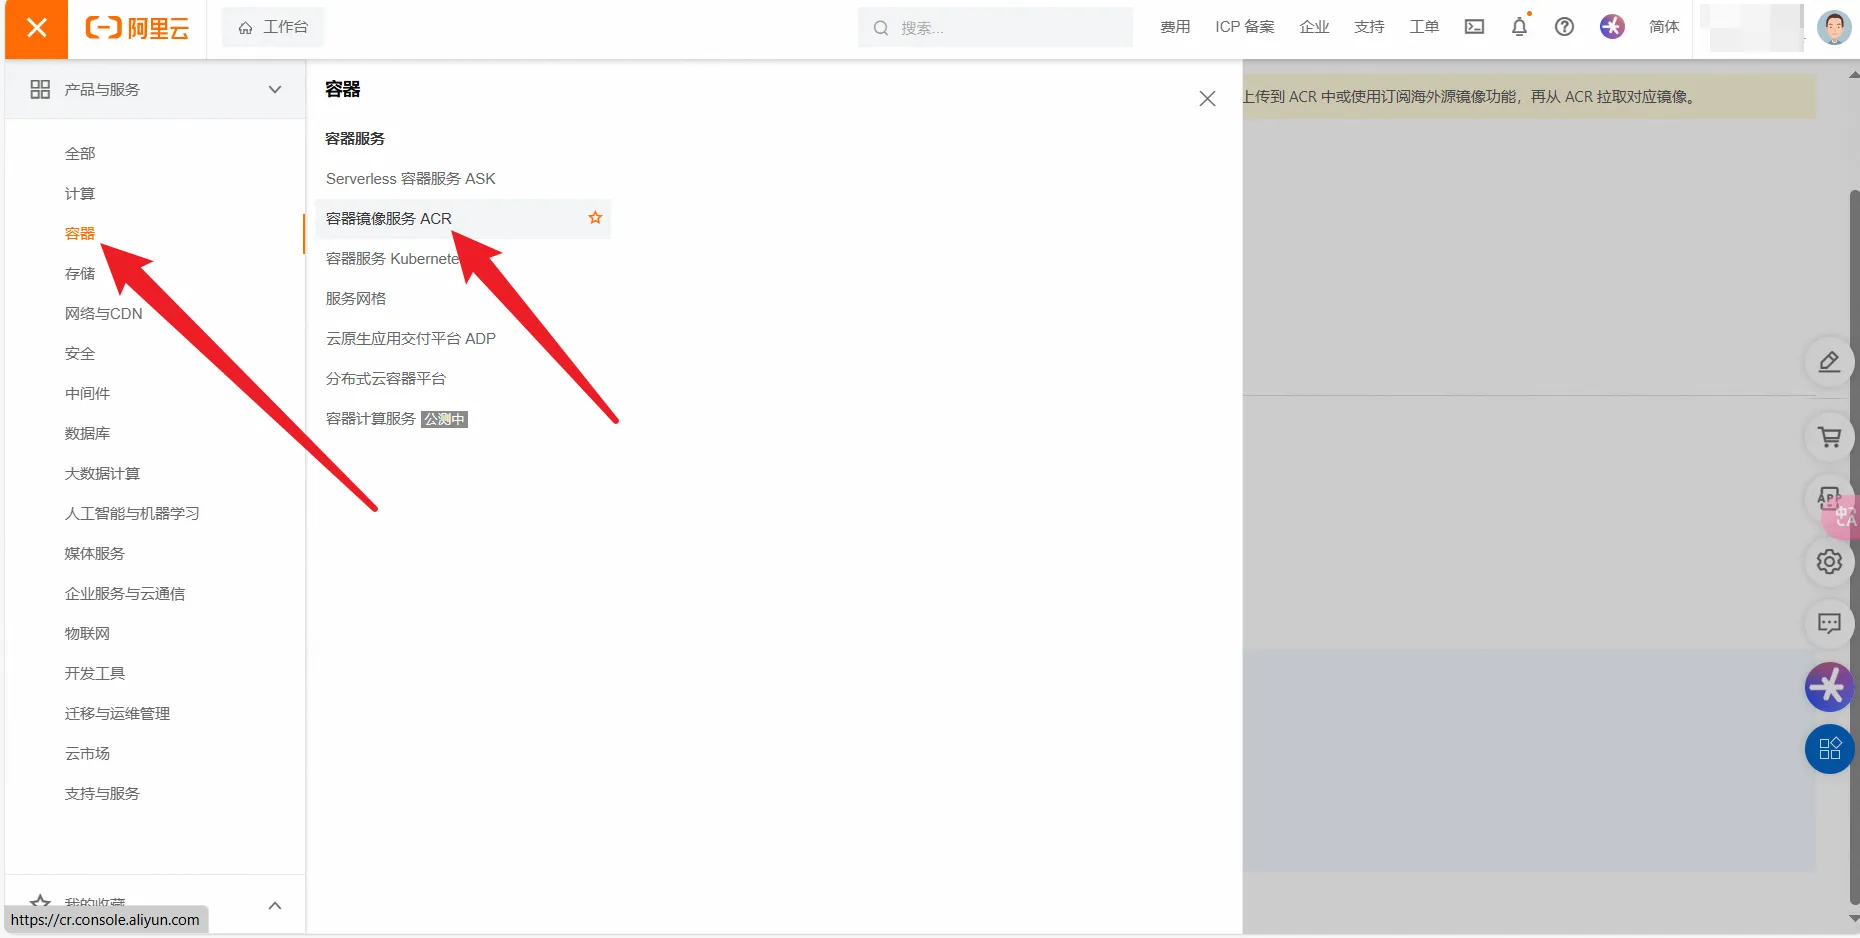
选择容器镜像服务
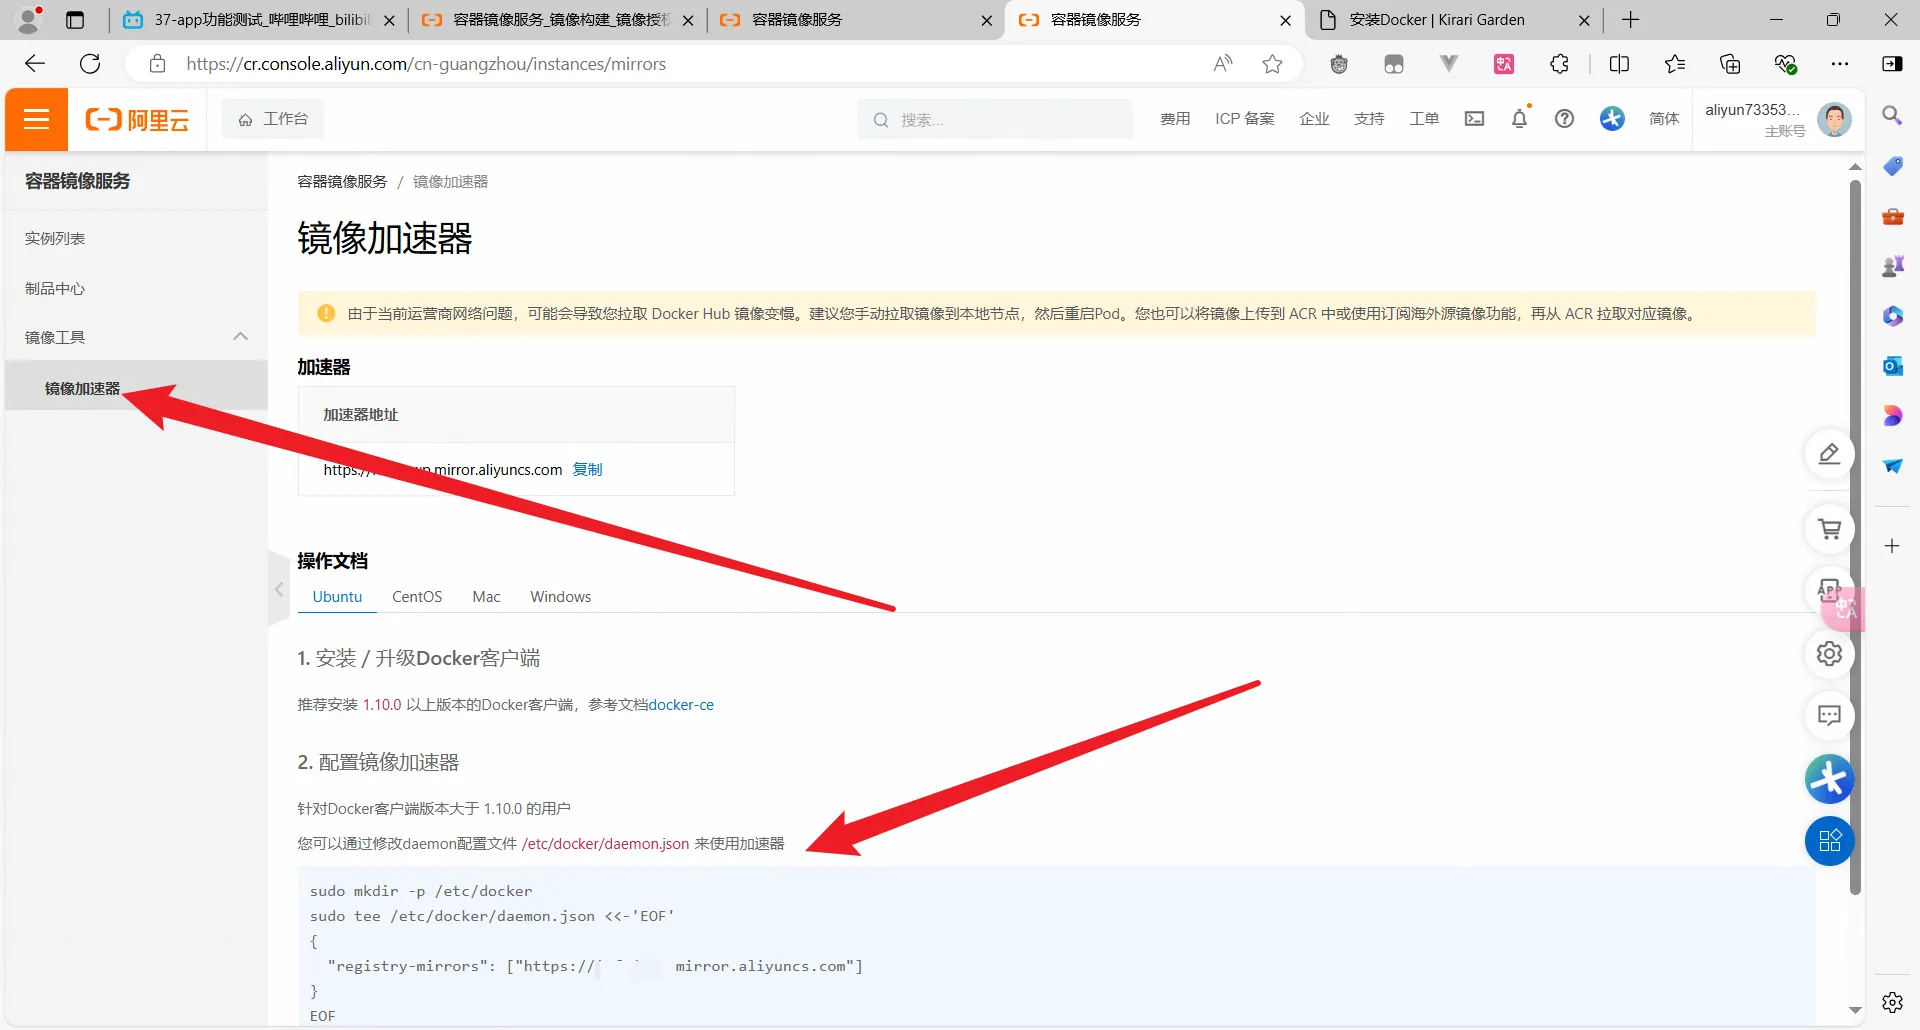
阿里云给出了加速地址和所需要的指令
全部复制就行
以linux为例
bash
sudo mkdir -p /etc/docker    -- 创建文件夹
sudo tee /etc/docker/daemon.json <<-'EOF'    -- 输入文件,写入数据
{
  "registry-mirrors": ["https://xxxxxx.mirror.aliyuncs.com"]   --写入加速地址
}
EOF                      --退出
sudo systemctl daemon-reload      --重新加载配置
sudo systemctl restart docker --重启bash
sudo mkdir -p /etc/docker
sudo tee /etc/docker/daemon.json <<-'EOF'
{
  "registry-mirrors": ["https://xxxxxx.mirror.aliyuncs.com"]
}
EOF
sudo systemctl daemon-reload
sudo systemctl restart docker